How to automatically deploy your full-stack JavaScript app with AWS CodePipeline
September 15, 2023 | Originally published on the ThisDot blog
In our previous blog post (How to host a full-stack JavaScript app with AWS CloudFront and Elastic Beanstalk) we set up a horizontally scalable deployment for our full-stack javascript app. In this article, we would like to show you how to set up AWS CodePipeline to automatically deploy changes to the application.
APP Structure
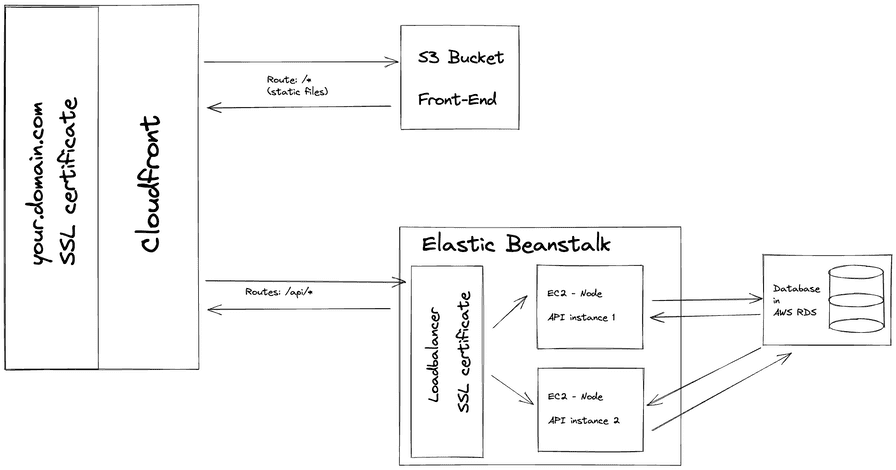
Our application is a simple front-end with an API back-end set up in an NX monorepo. The production built API code is hosted in Elastic Beanstalk, while the front-end is stored in S3 and hosted through CloudFront. Whenever we are ready to make a new release, we want to be able to deploy the new API and front-end versions to the existing distribution.
In this article, we will set up a CodePipeline to deploy changes to the main branch of our connected repository.
CodePipeline
CodeBuild and the buildspec file
First and foremost, we should set up the build job that will run the deploy logic. For this, we are going to need to use CodeBuild. Let’s go into our repository and set up a build-and-deploy.buildspec.yml file. We put this file under the tools/aws/ folder.
version: 0.2

phases:
  install:
    runtime-versions:
      nodejs: 18
    on-failure: ABORT
    commands:
      - npm ci
  build:
    on-failure: ABORT
    commands:
      # Build the front-end and the back-end
      - npm run build:$ENVIRONMENT_TARGET
      # TODO: Push FE to S3
      # TODO: Push API to Elastic beanstalk
This buildspec file does not do much so far, we are going to extend it. In the installation phase, it will run npm ci to install the dependencies and in the build phase, we are going to run the build command using the ENVIRONMENT_TARGET variable. This is useful, because if you have more environments, like development and staging you can have different configurations and builds for those and still use the same buildspec file.
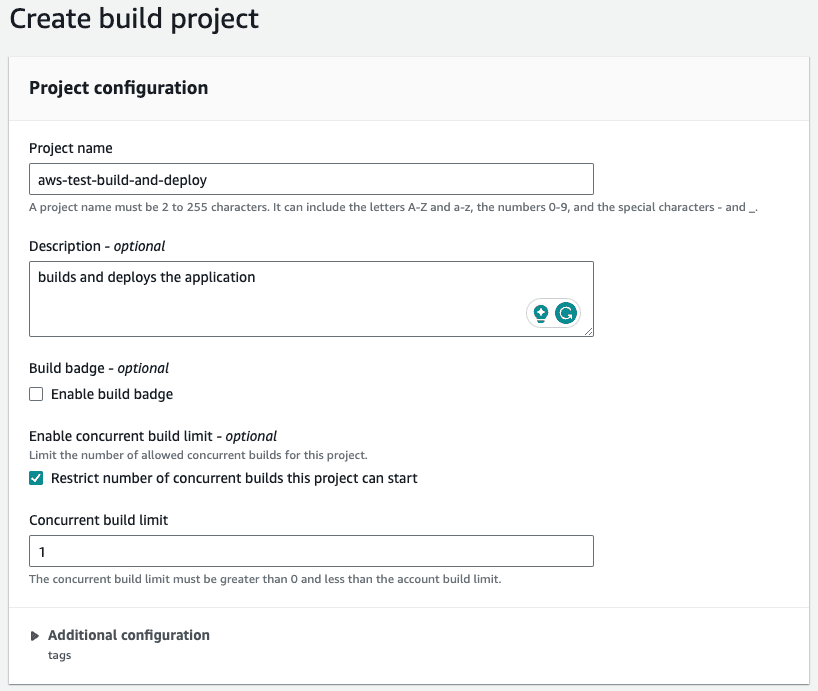
Let’s go to the Codebuild page in our AWS console and create a build project. Add a descriptive name, such as your-appp-build-and-deploy. Please provide a meaningful description for your future self. For this example, we are going to restrict the number of concurrent builds to 1.
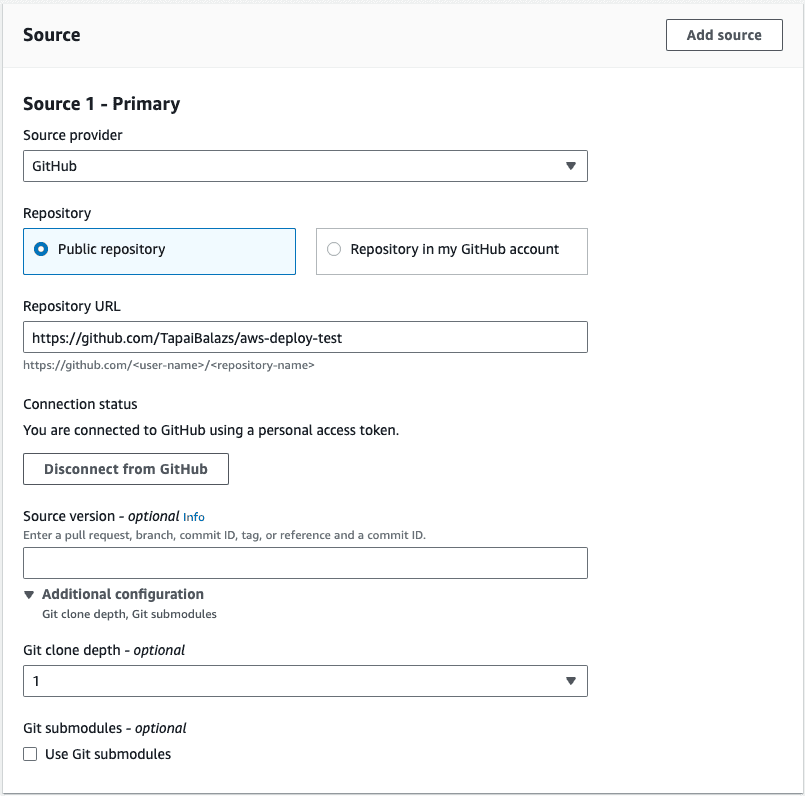
The next step is to set up the source for this job, so we can keep the buildspec file in the repository and make sure this job uses the steps declared in the yaml file. We use an access token that allows us to connect to GitHub. Here you can read more on setting up a GitHub connection with an access token. You can also connect with Oauth, or use an entirely different Git provider.
We set our provider to GitHub and provided the repository URL. We also set the Git clone depth to 1, because that makes checking out the repo faster.
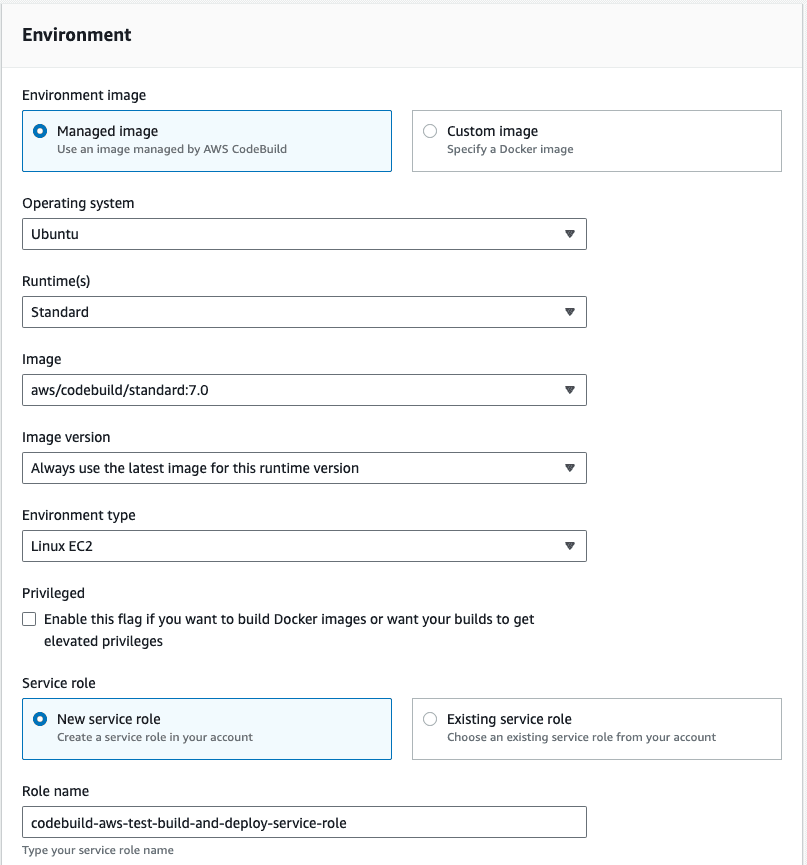
In the Environment section, we recommend using an AWS CodeBuild managed image. We use the Ubuntu Standard runtime with the aws/codebuild/standard:7.0 version. This version uses Node 18. We want to always use the latest image version for this runtime and as the Environment type we are good with Linux EC2. We don’t need elevated privileges, because we won’t build docker images, but we do want to create a new service role.
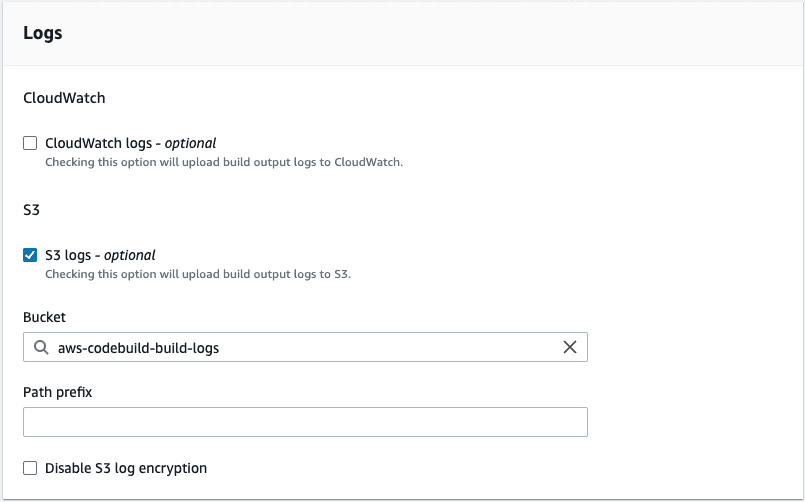
In the Buildspec section select Use a buildspec file and give the path from your repository root as the Buildspec name. For our example, it is tools/aws/build-and-deploy.buildspec.yml. We leave the Batch configuration and the Artifacts sections as they are and in the Logs section we select how we want the logs to work. For this example, to reduce cost, we are going to use S3 logs and save the build logs in the aws-codebuild-build-logs bucket that we created for this purpose. We are finished, so let’s create the build project.
CodePipeline setup
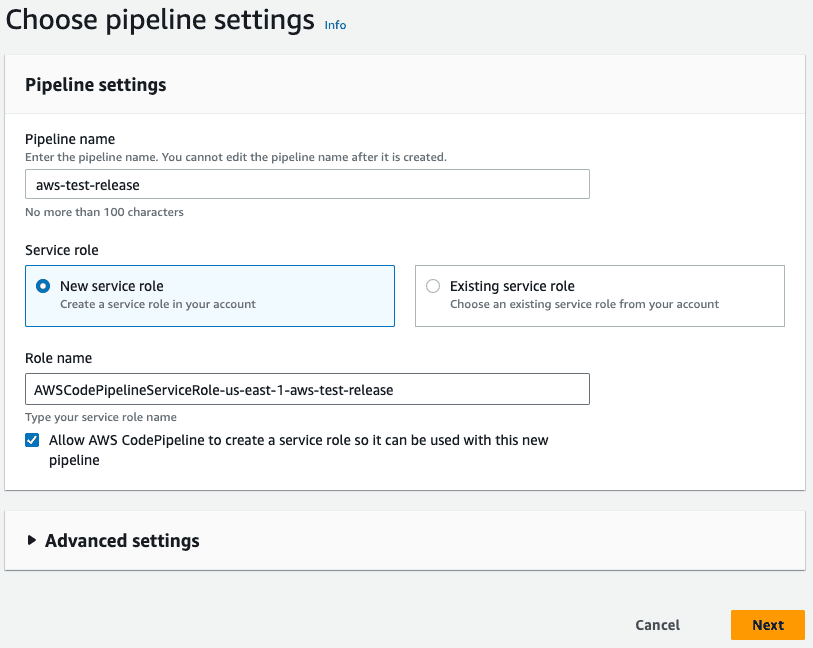
To set up automated deployment, we need to create a CodePipeline. Click on Create pipeline and give it a name. We also want a new service role to be created for this pipeline.
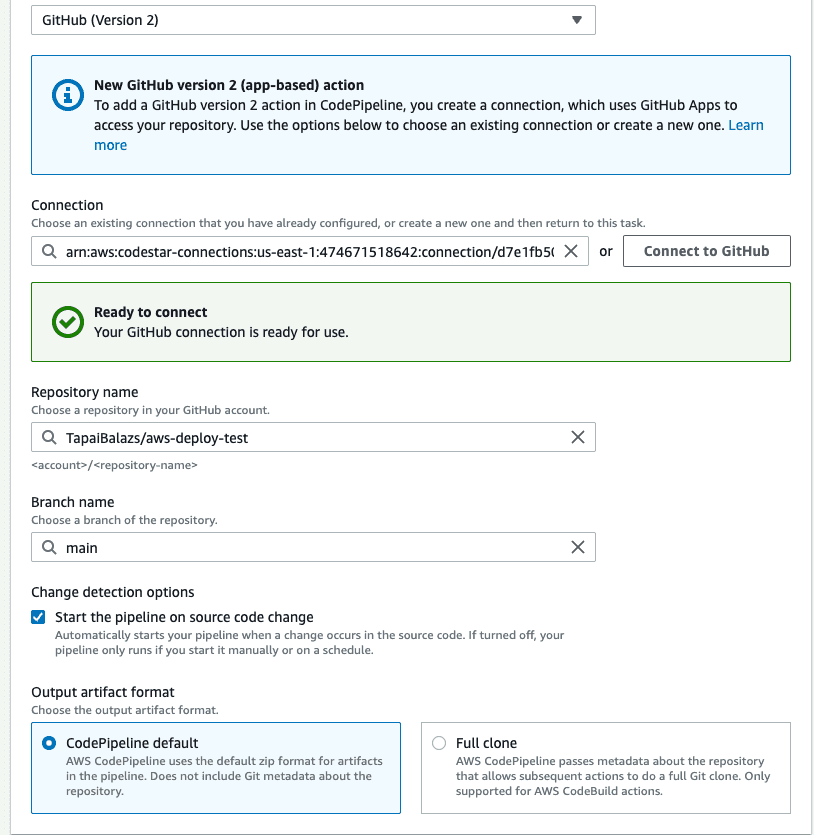
Next, we should set up the source stage. As the source provider, we need to use GitHub (version2) and set up a connection. You can read about how to do it here. After the connection is set up, select your repository and the branch you want to deploy from. We also want to start the pipeline if the source code changes. For the sake of simplicity, we want to have the Output artefact format as CodePipeline default.
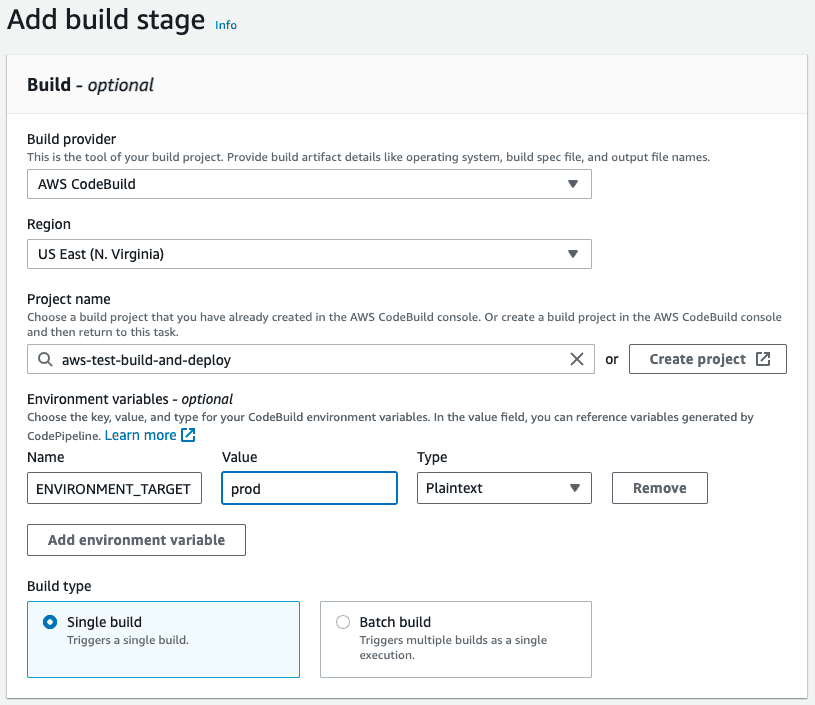
At the Build stage, we select AWS CodeBuild as the build provider and let’s select the build that we created above. Remember that we have the ENVIRONMENT_TARGET as a variable used in our build, so let’s add it to this stage with the Plaintext value prod. This way the build will run the build:prod command from our package.json. As the Build type we want Single build.
We can skip the deployment stage because we are going to set up deployment in our build job. Review our build pipeline and create it. After it is created, it will run for the first time. At this time it will not deploy anything but it should run successfully.
Deployment prerequisites
To be able to deploy to S3 and Elastic Beanstalk, we need our CodeBuild job to be able to interact with those services. When we created the build, we created a service role for it. In this example, the service role is codebuild-aws-test-build-and-deploy-service-role. Let’s go to the IAM page in the console and open the Roles page. Search for our codebuild role and let’s add permissions to it. Click the Add permissions button and select Attach policies. We need two AWS-managed policies to be added to this service role. The AdministratorAccess-AWSElasticBeanstalk will allow us to deploy the API and the AmazonS3FullAccess will allow us to deploy the front-end. The CloudFrontFullAccess will allow us to invalidate the caches so CloudFront will send the new front-end files after the deployment is ready.
Deployment
Upload the front-end to S3
Uploading the front-end should be pretty straightforward. We use an AWS CodeBuild managed image in our pipeline, therefore, we have access to the aws command. Let’s update our buildspec file with the following changes:
phases:
# ...
  build:
    on-failure: ABORT
    commands:
      # Build the front-end and the back-end
      - npm run build:$ENVIRONMENT_TARGET
      # Delete the current front-end and deploy the new version front-end
      - aws s3 sync dist/apps/frontend/ s3://$FRONT_END_BUCKET --delete
      # Invalidate cloudfront caches to immediately serve the new front-end files
      - aws cloudfront create-invalidation --distribution-id $CLOUDFRONT_DISTRIBUTION_ID --paths "/index.html"
      # TODO: Push API to Elastic beanstalk
First, we upload the fresh front-end build to the S3 bucket, and then we invalidate the caches for the index.html file, so CloudFront will immediately serve the changes. If you have more static files in your app, you might need to invalidate caches for those as well.
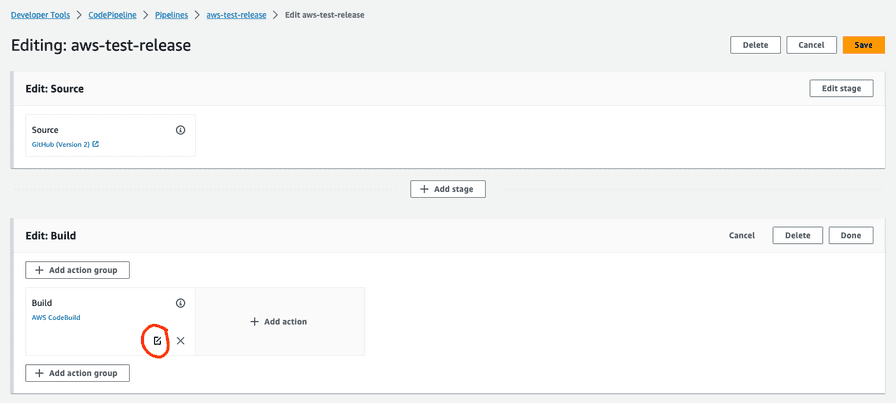
Before we push the above changes up, we need to update the environment variables in our CodePipeline. To do this open the pipeline and click on the Edit button. This will then enable us to edit the Build stage. Edit the build step by clicking on the edit button.
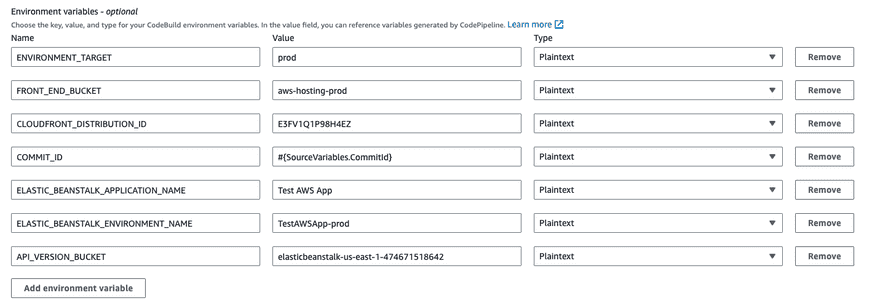
On this screen, we add the new environment variables. For this example, it is aws-hosting-prod as Plaintext for the FRONT_END_BUCKET and E3FV1Q1P98H4EZ as Plaintext for the CLOUDFRONT_DISTRIBUTION_ID
Now if we add changes to our index.html file, for example, change the button to <button id="hello">HELLO 2</button>, commit it and push it. It gets deployed.
Deploying the API to Elastic Beanstalk
We are going to need some environment variables passed down to the build pipeline to be able to deploy to different environments, like staging or prod. We gathered these below:
COMMIT_ID:#{SourceVariables.CommitId}- This will have the commit id from the checkout step. We include this, so we can always check what commit is deployed.ELASTIC_BEANSTALK_APPLICATION_NAME:Test AWS App- This is the Elastic Beanstalk app which has your environment associated.ELASTIC_BEANSTALK_ENVIRONMENT_NAME:TestAWSApp-prod- This is the Elastic Beanstalk environment you want to deploy toAPI_VERSION_BUCKET:elasticbeanstalk-us-east-1-474671518642- This is the S3 bucket that was created by Elastic Beanstalk
With the above variables, we can make some new variables during the build time, so we can make sure that every API version is unique and gets deployed. We set this up in the install phase.
# ...

phases:
  install:
    runtime-versions:
      nodejs: 18
    on-failure: ABORT
    commands:
      - APP_VERSION=`jq '.version' -j package.json`
      - API_VERSION=$APP_VERSION-build$CODEBUILD_BUILD_NUMBER
      - API_ZIP_KEY=$COMMIT_ID-api.zip
      - 'APP_VERSION_DESCRIPTION="$AP_VERSION: $COMMIT_ID"'
      - npm ci
# ...
The APP_VERSION variable is the version property from the package.json file. In a release process, the application’s version is stored here. The API_VERSION variable will contain the APP_VERSION and as a suffix, we include the build number. We want to upload this API version by indicating the commit ID, so the API_ZIP_KEY will have this information. The APP_VERSION_DESCRIPTION will be the description of the deployed version in Elastic Beanstalk.
Finally, we are going to update the buildspec file with the actual Elastic Beanstalk deployment steps.
phases:
# ...
  build:
    on-failure: ABORT
    commands:
      # ...

      # ZIP the API
      - zip -r -j dist/apps/api.zip dist/apps/api
      # Upload the API bundle to S3
      - aws s3 cp dist/apps/api.zip s3://$API_VERSION_BUCKET/$ENVIRONMENT_TARGET/$API_ZIP_KEY
      # Create new API version in Elastic Beanstalk
      - aws elasticbeanstalk create-application-version --application-name "$ELASTIC_BEANSTALK_APPLICATION_NAME" --version-label "$API_VERSION" --description "$APP_VERSION_DESCRIPTION" --source-bundle "S3Bucket=$API_VERSION_BUCKET,S3Key=$ENVIRONMENT_TARGET/$API_ZIP_KEY"
      # Deploy new API version
      - aws elasticbeanstalk update-environment --application-name "$ELASTIC_BEANSTALK_APPLICATION_NAME" --version-label "$API_VERSION" --environment-name "$ELASTIC_BEANSTALK_ENVIRONMENT_NAME"
      # Wait until the Elastic Beanstalk environment is stable
      - aws elasticbeanstalk wait environment-updated --application-name "$ELASTIC_BEANSTALK_APPLICATION_NAME" --environment-name "$ELASTIC_BEANSTALK_ENVIRONMENT_NAME"
Let’s make a change in the API, for example, the message sent back by the /api/hello endpoint and push up the changes.
Now every time a change is merged to the main branch, it gets deleted to our production deployment. Using these guides, you can set up multiple environments, and you can configure separate CodePipeline instances to deploy from different branches. I hope this guide proved to be helpful to you.
This Dot Labs is a development consultancy that is trusted by top industry companies, including Stripe, Xero, Wikimedia, Docusign, and Twilio. This Dot takes a hands-on approach by providing tailored development strategies to help you approach your most pressing challenges with clarity and confidence. Whether it’s bridging the gap between business and technology or modernizing legacy systems, you’ll find a breadth of experience and knowledge you need. Check out how This Dot Labs can empower your tech journey.

