How to set up screenshot comparison testing with cypress inside an NX workspace
August 06, 2021 | Originally published on the ThisDot blog
I have encountered several projects where visual testing was done manually. On those projects, usually, a lot of visual changes made it to production then they came back as bugs. Recently, I needed to set up automated visual testing on an NX project, to make it safer for us to refactor CSS. In this blog post, I’d like to show you how to set up screenshot comparison tests with Cypress inside an NX workspace.
I have done a JS Marathon episode back in March, where I wrote some cypress tests. I updated the dependencies on that project and I’ll use that repository as an example for this blog post. Feel free to check it out.
What is snapshot testing?
Snapshot or screenshot comparison tests work based on comparing images pixel by pixel. For them to work, we need to have baseline images, which are taken during the first test run, however, these tests can be extremely flaky. The first issue comes from the fact, that a screenshot taken on a Windows machine will certainly be different from a screenshot taken on a Mac. It can even differ when you take the same screenshot on different monitors, or if you change colour profiles between two tests on the same monitor.
Even if you make sure that the same configuration is set on both machines, take into account that for example, scrollbars look different on different operating systems. We are going to mitigate this problem using Docker, which will run your tests on a Linux os every time. Let’s jump right into it!
Install dependencies
For our comparison tets, we are going to use the cypress-image-snapshot package with its type declarations.
npm install --save-dev cypress-image-snapshot @types/cypress-image-snapshot
After that, we need to register the plugin for our cypress tests. Let’s register the plugin for our cypress-functional tests, by adding the following to the plugins/index.js file:
const { preprocessTypescript } = require('@nrwl/cypress/plugins/preprocessor');
const { addMatchImageSnapshotPlugin } = require('cypress-image-snapshot/plugin');

module.exports = (on, config) => {
  // we register our plugin using its register method:
  addMatchImageSnapshotPlugin(on, config);

  on('file:preprocessor', preprocessTypescript(config));

  // force color profile
  on('before:browser:launch', (browser = {}, launchOptions) => {
    if (browser.family === 'chromium' && browser.name !== 'electron') {
      launchOptions.args.push('--force-color-profile=srgb');
    }
  });
};
We also added a special launchOption to our chrome browsers. The --force-color-profile=srgb will ensure that the same colour profile is used inside a Docker container, and in our CI. Since screenshots taken on different devices will differ from each other, we need to make sure that we can reproduce the exact environment every time we test for screenshots. This is also the reason why we don’t want to take screenshots while we write our tests using the test runner.
Now, we need to register the matchImageSnapshot command, which we can do in the support/commands.ts file:
import { addMatchImageSnapshotCommand } from 'cypress-image-snapshot/command';

declare namespace Cypress {
  interface Chainable<Subject> {
    /**
     * Custom command to match image snapshots.
     * @example cy.matchImageSnapshot('greeting')
     */
    matchImageSnapshot(snapshotName?: string): void;
  }
}

// We set up the settings
addMatchImageSnapshotCommand({
  customSnapshotsDir: 'src/snapshots',
  failureThreshold: 0.05, // threshold for entire image
  failureThresholdType: 'percent', // percent of image or number of pixels
  customDiffConfig: { threshold: 0.1 }, // threshold for each pixel
  capture: 'viewport' // capture viewport in screenshot
});


// We also overwrite the command, so it does not take a sceenshot if we run the tests inside the test runner
Cypress.Commands.overwrite('matchImageSnapshot', (originalFn, snapshotName, options) => {
  if (Cypress.env('ALLOW_SCREENSHOT')) {
    originalFn(snapshotName, options)
  } else {
    cy.log(`Screenshot comparison is disabled`);
  }
})
Now we have registered the command that will take care of our screenshot-comparison. We are going to use specifically defined environment variables to trigger screenshot matching. And if the environment does not allow taking screenshots, a log entry will be added to the test.
Our baseline images will be recorded inside the apps/customer-functional/src/snapshots/ folder, which we added to our configuration using the customSnapshotsDir property. NX will run the tests inside the apps/customer-functional folder, so we need to set the path as if we were inside that folder.
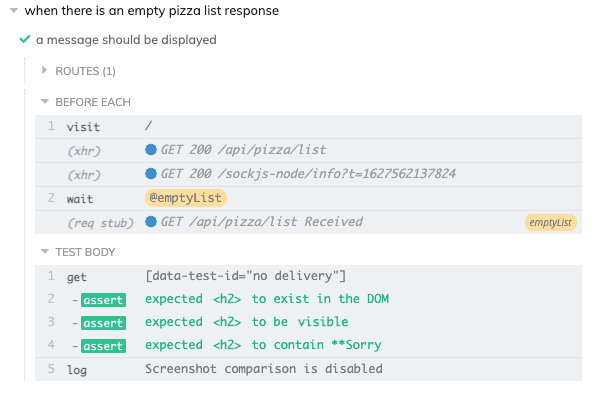
Let’s open our integration/1-pizza-list.spec.ts file and add our command to the end of our first test:
// ...
it(`a message should be displayed`, () => {
  // we get the error message that has the data-test-id
  cy.get(`[data-test-id="no delivery"]`)
    .should('exist')
    .and('be.visible')
    .and(
      'contain',
      'Sorry, but we are not delivering pizzas at the moment.'
    );

  // we take the screenshot
  cy.matchImageSnapshot('Empty pizza list')
});
Now, if we run our tests using the npm run functional:customer:debug command, the cypress test runner will open, but the screenshot will be not recorded, because the ALLOW_SCREENSHOT environment variable is undefined.
Set up configurations
Let’s edit our apps/customer-functional/cypress.json file, and add the following:
{
  "env": {
    "ALLOW_SCREENSHOT": false
  },
  // ...
}
Now we copy the contents of the config file, and create a new config file with the cypress.snapshot.json name, where we set the ALLOW_SCREENSHOT variable to true.
{
  "env": {
    "ALLOW_SCREENSHOT": true
  },
  // ...
}
Now we should set up a snapshot configuration in our angular.json file. Please note, that in NX projects not using the angular-cli, the workspace.json file needs to be edited.
We search for our project config, which is under customer-functional, and modify the "e2e" config object under "architect" ("targets" in React based NX monorepos). We add a new entry under the "configurations" object as follows:
"configurations": {
  "production": {
    "devServerTarget": "customer:serve:production"
  },
  "snapshot": {
    "cypressConfig": "apps/customer-functional/cypress.snapshot.json"
  }
}
Now if we run npm run e2e customer-functional --configuration=snapshot, baseline images will be generated for our test. But we don’t want to do that just yet.
Run the tests inside docker
The Cypress team maintains docker images, which makes our life easier when we want to run our tests in CI/CD. The cypress/included images contain cypress, and they are set up to run cypress run and then exit when the tests finish running. In an NX workspace, we run cypress tests with other commands. Let’s create our own Dockerfile inside our tools/snapshot-comparison folder. At the time of writing this article, the latest cypress version is 8.0.0, so we are going to use that as a base:
FROM cypress/included:8.0.0

ENTRYPOINT ["npm", "run", "snapshot:customer-functional"]
When we build this image, we can use it as a container. It will run the npm run snapshot:customer-functional command, which will run the cypress tests on our customer front-end. We set this script up in our package.json:
{
  "scripts": {
    // ...
      "snapshot:customer-functional": "npm run e2e --skip-nx-cache --configuration=snapshot customer-functional",
    // ...
  }
}
We want to run these tests without caching, that is why we added the --skip-nx-cache, and we run the tests with the snapshot configuration for the customer-functional project. Let’s build our docker image:
docker build . -f tools/snapshot-comparison/Dockerfile -t snapshot-testing
With this command, we run the docker build process from the root directory of the project. The -f flag sets the Dockerfile we want to build, and the -t flag will name the image. After the image is built, if we run docker images we can see that we have the snapshot-testing image.
Let’s add two more scripts to our package.json. One for running screenshot comparison tests locally inside docker and one for updating existing snapshots.
{
  "scripts": {
    // ...
    "snapshot:customer-functional:docker": "docker run -it --rm -e CYPRESS_updateSnapshots=%CYPRESS_updateSnapshots% -v $PWD:/cypress -w /cypress snapshot-testing",
    "snapshot:customer-functional:update-snapshots": "CYPRESS_updateSnapshots=true npm run affected:e2e:snapshot",
    // ...
  }
}
The CYPRESS_updateSnapshots environment variable tells the cypress-image-snapshot plugin to overwrite the existing baseline images. This comes in handy when you need to make changes to the UI and you need to update the snapshots for future reference. We pass this as an environment variable to our docker container using the -e flag. The -it flag will make sure that you see the logs during the run in your terminal. The --rm will remove the container when the process exits, even if it is a non-zero exit code. With the -v $PWD:/cypress flag we mount our project as a volume inside the container into its /cypress folder, then with the -w cypress flag we set the working directory inside the container to the /cypress folder. This is necessary since we can’t mount a volume into the root directory of a container. The snapshot:customer-functional:update-snapshots command sets the CYPRESS_updateSnapshots environment variable to true and runs the first command.
Please note, that these commands will not work on a Windows machine. Instead of $PWD:/cypress you need to use %cd%:/cypress when you run it from the command line. For updating snapshots, setting an environment variable works differently as well: set CYPRESS_updateSnapshots=true && npm run e2e:docker.
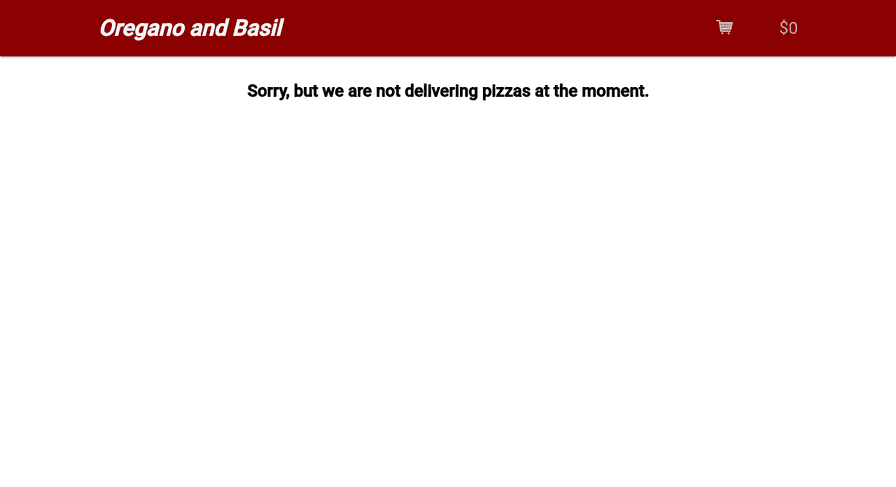
After we run the snapshot:customer-functional:docker command, we can see that there’s a baseline image generated inside the apps/customer-functional/src/snapshots/1-pizza-list.spec.ts/ folder.
Now let’s simulate that we accidentally replace the background-color property of the header from darkred to blue. When we run the tests again, there is going to be a __diff_output__ folder generated with the diff images. The diff image contains (from left to right) the baseline image, the differences and the current image.
If changing the colour of the header was not a mistake, but for example, the client requests us to change the design of the page, we can just run snapshot:customer-functional:update-snapshots, and then commit the changed baseline images.
This Dot Labs is a modern web consultancy focused on helping companies realize their digital transformation efforts. For expert architectural guidance, training, or consulting in React, Angular, Vue, Web Components, GraphQL, Node, Bazel, or Polymer, visit thisdotlabs.com.
This Dot Media is focused on creating an inclusive and educational web for all. We keep you up to date with advancements in the modern web through events, podcasts, and free content. To learn, visit thisdot.co.


